시작
유튜브 Interactive Developer님의 HTML5 Canvas Tutorial 영상을 보고 관심을 가지게 되어서, 간단히 캔버스를 클릭하면 불꽃이 터지는 효과를 만들어보기로 했다. 강의에서 클래스로 기능을 구현하시는 걸 따라하며 겸사겸사 연습하기로.
구현
가장 처음으로 기본세팅.
index.html
<!DOCTYPE html>
<html lang="en">
<head>
    <meta charset="UTF-8">
    <meta http-equiv="X-UA-Compatible" content="IE=edge">
    <meta name="viewport" content="width=device-width, initial-scale=1, maximum-scale=1, user-scalable=0">
    <title></title>
    <link rel="stylesheet" href="style.css">
</head>
<body>
    <script type="module" src="app.js"></script>
</body>
</html>
style.css
* {
    outline: 0;
    margin: 0;
    padding: 0;
}

html {
    width: 100%;
    height: 100%;
}

body {
    width: 100%;
    height: 100%;
    background-color: #ffffff;
}

canvas {
    width: 100%;
    height: 100%;
}
app.js
class App {
    constructor() {
        this.canvas = document.createElement('canvas');
        document.body.appendChild(this.canvas);
        this.ctx = this.canvas.getContext('2d');

        // 고해상도 디스플레이 해상도 조정
        this.pixelRatio = (window.devicePixelRatio > 1) ? 2 : 1;

        window.addEventListener('resize', this.resize.bind(this), false);
        this.resize();
    }

    resize() {
        this.stageWidth = document.body.clientWidth;
        this.stageHeight = document.body.clientHeight;

        this.canvas.width = this.stageWidth * this.pixelRatio;
        this.canvas.height = this.stageHeight * this.pixelRatio;
        this.ctx.scale(this.pixelRatio, this.pixelRatio);
    }
};

window.onload = () => {
    new App();
};
html 페이지를 만들고, 캔버스가 화면 전체를 차지하도록 css로 설정하였다.
App.js에서는 Canvas 요소를 생성하여 body에 추가한 뒤, getContext() 메서드를 통해 렌더링 컨텍스트를 가져온다.
여기서는 2차원 렌더링 컨텍스트를 생성했다.
캔버스 위를 클릭할 때마다 불꽃이 생성되어야 한다.
캔버스에 onclick 이벤트를 추가하여 이벤트가 발생한 좌표에서 firework 클래스를 생성한다.
추가로 랜덤으로 생성될 색상도 같이 넘겨준다.
app.js
import { Firework } from "./firework.js";

const COLORS = [
    {r: 255, g:255, b:255}, // white
    {r: 45, g: 74, b: 227}, // blue
    {r: 250, g: 255, b: 89}, // yellow
    {r: 255, g: 104, b: 248}, // pupple
    {r: 44, g: 209, b: 252}, // skyblue
    {r: 54, g: 233, b: 84}, // green
];

const randomColor = () => {
    const random = Math.ceil(Math.random() * 6) - 1;
    return COLORS[random]
}

class App {
    constructor() {
        ...

        this.canvas.addEventListener('click', (event) => {
            const x = event.pageX;
            const y = event.pageY;
            const color = randomColor();

            new Firework(x, y, color, this.ctx);
        }, false)
    }

    ...
};

window.onload = () => {
    new App();
};
firework.js
import { Time } from './time.js'

const PI2 = Math.PI * 2;

export class Firework {
    constructor (x, y, color, ctx) {
        this.ctx = ctx;

        this.x = x;
        this.y = y;
        this.radius = Math.random() * 3 + 1;
        this.color = color;

        this.speed = Math.random() * 1 + 1;
        this.totalParticles = Math.ceil(Math.random() * 20) + 9;
        this.particles = [];
        this.angle = PI2 / this.totalParticles;

        this.time = new Time();
        this.disappearTime = Math.ceil(Math.random() * 3);
    }
}
time.js
export class Time {
    constructor() {
        this.delta = 0;
        this.startTime = Date.now();
    }

    update() {
        const currentTime = Date.now();
        this.delta = (currentTime - this.startTime)* 0.001;
    }
}
불꽃이 생성될 좌표, 각 불꽃의 크기, 총 불꽃의 개수, 각 불꽃의 각도와 속도, 불꽃이 유지되는 시간 등을 생성자에 담았다.
시간 관리를 위해서 Time 클래스를 사용했는데, 클래스가 생성될 때(클릭했을 때)를 기록한 뒤, time.update() 메서드를 통해 현재시각과 비교하여(time.delta) 유지시간을 초과하면 사라지게 할 계획이다.
생성될 불꽃의 초기값을 설정하였으니 각각의 불꽃을 그려주어야 한다.
firework.js
import { Particle } from 'particle.js'

export class Firework {
    constructor (x, y, color, ctx) {
        ...

        this.createParticles();
    }

    createParticles() {
        for (let i = 0; i <= this.totalParticles; i++) {
            const item = new Particle(
                this.x,
                this.y,
                this.radius,
                this.color,
                this.speed,
                this.angle * i,
            )
            this.particles[i] = item;
        }
    }
}
particle.js
const PI2 = Math.PI * 2;

export class Particle {
    constructor(x, y, radius, color, speed, angle) {
        this.x = x;
        this.y = y;
        this.radius = radius;
        this.color = color;
        this.speed = speed;
        this.angle = angle;
    }
}
firework.js에 createParticles() 메서드를 추가하여 초기에 설정된 총 불꽃의 개수만큼 Particle을 생성한 뒤 배열에 담는다.
Particle()에는 각각의 불꽃을 그리고 움직이기 위해 좌표와 크기, 속도와 각도 등을 인자로 받았다.
이제 불꽃을 그리고 움직이게 하면 된다.
불꽃마다 다른 방향으로 퍼지게 되므로 Particle에서 위치를 변경해주고, 동시에 사라져야하니 firework에서 시간을 비교하는 분기를 넣는다.
firework.js
...
export class Firework {
    constructor (x, y, color, ctx) {
        ...

        window.requestAnimationFrame(this.animate.bind(this));
    }
    ...

    animate() {
        // 리페인트를 위한 재귀적 호출
        if (this.time.delta < this.disappearTime) {
            window.requestAnimationFrame(this.animate.bind(this));
            this.time.update();
        }

        for(let i = 0; i < this.totalParticles; i++) {
            const item = this.particles[i];
            item.animate(this.ctx, this.time.delta);
        }
    }
}
particle.js
export class Particle {
    ...

    animate(ctx, delta) {
        this.update(delta)
        ctx.beginPath();

        ctx.fillStyle = `rgb(${this.color.r}, ${this.color.g}, ${this.color.b})`;
        ctx.arc(this.currentx, this.currenty, this.radius, 0, PI2, false);
        ctx.fill();
    }

    update(delta) {
        this.currentx = this.x + (Math.cos(this.angle) * this.speed * delta);
        this.currenty = this.y - ((Math.sin(this.angle) * this.speed * delta) - (0.5 * 30 * delta**2));
    }
}
firework의 생성자에 window.requestAnimateFrame() 메서드를 이용하여 클릭하면 애니메이션을 수행하고 업데이트하게 한다.
firework.animate()에는 시간 변화가 유지 시간보다 크면 재귀를 멈춰 더이상 그려지지 않도록 하였다.
Particle에서는 우선 update(delta)를 통해 시간과 속도를 고려해 위치를 조정한 뒤, animate(ctx)에서 각각의 불꽃을 크기와 위치에 맞게 그려준다.
불꽃의 좌표 변화는 포물선 운동을 참고하여 작성하였는데, 공기저항이 적용되어있지 않고, 위치변화가 뚜렷하게 나타나지 않길래 중력값을 크게 조정하였다.
마지막으로 잔상을 주기 위해서 불투명한 화면을 덮어씌워주면 된다.
App.js
class App {
    constructor() {
        ...

        window.requestAnimationFrame(this.animate.bind(this));
    }

    animate() {
        window.requestAnimationFrame(this.animate.bind(this));

        this.ctx.beginPath()
        this.ctx.fillStyle = 'rgba(0, 0, 0, 0.1)';
        this.ctx.fillRect(0, 0, this.stageWidth, this.stageHeight);
        this.ctx.fill();
    }
    ...
}
...
이렇게 해주면 기본적으로 배경이 초당 60번씩 불투명한 검정 배경으로 덮어씌워지면서, 이전에 그려진 불꽃을 흐리게하여 잔상으로 보이게 해준다.
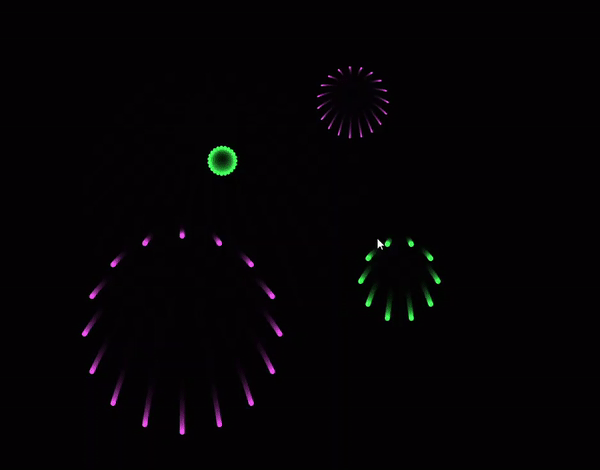
완성된 결과물은 아래와 같다. 의도대로 잘 작동하는 모습이다.
참고
HTML5 Canvas Tutorial : 자바스크립트로 움직이는 그라데이션 만들기 by Interactive Developer